Friday, June 25, 2010
The Tadpoles Tale
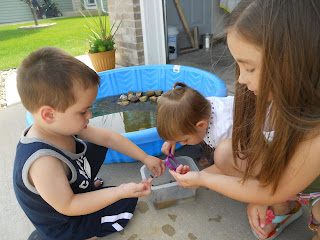
So, in the beginning of June, we went on a great tadpole hunt. We rode our bikes around for almost two hours looking in every puddle and creek and riverbed we could find. At the end of the two hours, we were tired, hot, and had no tadpoles to show for all of our searching. We were so discouraged. The kids wanted to keep looking, but Nick and I decided we had better head for home since it looked like it was going to rain. Then, much to our surprise, we found a hundred tadpoles in a drainage puddle only a few blocks from our house. We took our bikes home, and loaded back into our car with all of our tadpole catching equipment. (A net and a few containers.) Then we proceeded to catch about seventy-five of the black, slippery, wiggly little creatures. Here we are hard at work.
The girls were quick to dive into the mud puddle; however, Spencer decided he didn't want to catch any of the tadpoles because his fingers would get dirty! I don't know if he was really adverse to getting dirty, or if he was simply afraid of the tadpoles, but in the end he did decide to join in the fun.
After arriving home, we placed the tadpoles in an old Styrofoam cooler, and set about doing a little research on how to keep them safe, happy, and healthy. We learned that we needed to keep them in natural water--no tap water, we needed to make sure they got some sun and some shade, and we needed to feed them regularly. And what do you feed a tadpole you might ask?
This:
Pond scum and boiled lettuce. And it's very important to feed them too, otherwise they might eat each other. (Learning about their food was also a great time to learn about algae in the water. We put a drop or two of our pond water on a microscope slide and watched all of the paramecium swimming around. The kids thought it was amazing that the tadpoles could feast on something so tiny!)
Everyday for a week we fed the tadpoles and moved them around in the sunlight. Eventually they got big enough that we had to move them out of the cooler and put them into a mini swimming pool. We were sure to get more pond water for the transfer, and this time we put in rocks for the froglets to rest on as they grew up. With their new home and some space to spread out, the tadpoles seemed to shoot out legs overnight. In fact, we thought we would be able to do our official unit on frogs after our National Symbols Unit. As it turned out, however, we had to take a week off of National Symbols to study about frogs and have a frog-freeing expedition. To say the kids loved raising tadpoles would be a massive understatement! They had so much fun, and were so sad the day we had to let our frogs go, that I think we will be raising frogs again next year too. And maybe every year after that.
Here are some pictures of the day we had our frog-freeing expedition.
Emma loved to "check-on" our tadpoles more than anyone else. And by "check-on" I mean poke, scatter, and hold the little guys! She especially loved it when they turned into froglets and could hop out of her hand.
Out of the seventy-five tadpoles that we originally caught, we had 31 to free on our frog-freeing expedition. I'm guessing some had already jumped out of our swimming pool, and the rest were still too little to free so we simply let them continue to grow up and hop out when they were ready. (We did have two little tadpoles pass onto the other side. One that Emma dropped in the grass that we simply could not find--she was so devastated she had killed one, and one that we found dead in the water. Since it wasn't being eaten by the other tadpoles, we assume that they had enough to eat and none of the others were exposed to a cruel and cannibalistic death.) Here are the 31 lucky little froggies! And they truly are lucky. As we read in some of our books, most tadpoles don't make it to become frogs. They are eaten by fish, bugs, etc. or lose their water source and dry out.
And here are my sad children saying good-bye to their baby frogs.
Sunday, June 20, 2010
"Flag Week"
We strung these stars over our windows for a festive look.
And here are the kids working so hard on our very own cloth flag. I let them do most of the work too, from cutting the strips, sewing them together, and ironing on the cloth stars we later cut out.
It took us almost all week to make our flag, but you can bet they will never forget what the colonial flag looked like, or what it represented. Here they are holding our finished product.
In addition to talking about flag history and sewing our own flag, we also used this week to talk about the pledge and to work on learning some of our patriotic songs. The kids mastered You're a Grand Old Flag, America the Beautiful, God Bless America, and even The National Anthem. (They didn't care much for My Country 'Tis of Thee). Actually, I think they loved The National Anthem the most. We read the story of Francis Scott Key and went through the words one at a time with our little dictionary. (It is amazing how quickly kids really do learn new words too. I asked Maddi a few weeks after this when we were reading Tuck Everlasting one night if she knew what "dawn" meant. She thought for a minute, and then said, "Oh, of course, it means early in the morning." "How did you know that?" I questioned. "From The National Anthem of course, Oh say can you see, by the dawn's early light." That was a reaffirming moment in time!) By the end of our discussion, I was telling them through my tears about the excitement Key felt as he looked through the fog and was relieved to see our flag was still there. What a moment that must have been for him. And how strong the spirit was in our little home school as I could bear testimony to the kids about God's hand in preserving this great nation! It was an awesome experience, and one that made me so grateful for our decision to home school! It's like I told my mother recently, my kids will take for granted much of their gospel learning. It may never occur to them that other kids don't know how God worked to preserve this country and to guide and inspire the founding fathers. It may never occur to them that other children don't automatically know the origins of the Native Americans, and so many other things. What a blessing the restored gospel and all of it's light and wisdom are! And how grateful I am to have been sustained by God thus far in our homeschooling experience so that I can teach my own children real truth as they learn of this incredible county! I do have such a testimony of the Greatness of this Country. I know God led righteous men and women here to seek religious freedom. I know the soldiers were aided by a heavenly presence in winning our countries freedom and the God truly did inspire the founding fathers to write a god-fearing, near perfect constitution for this country. One that would allow for the religious fervor that paved the way for the gospel to be restored in its fullness through the prophet Joseph Smith. A lot has happened since that restoration, but I believe that most people in this country still worship God Almighty, and I am saddened that one day this will cease to be true. I am afraid that day is coming too quickly, especially with recent legislation in this country to greatly weaken our constitution. What a sad and scary day when our constitution, in fulfillment of prophecy, will hang by a thread. And what a joy it will be when Christ Himself comes to reign again and establishes a perfect government upon the Earth. When will that be, I wonder. Hopefully sooner rather than later.
Tuesday, June 15, 2010
Introduction to Geography
They are
1. The planet earth
2. The seven continents
3. Countries within continents
4. States within countries
5. Counties and cities within states
We used these pictures to talk about the nature of the world. (We also discussed neighborhoods, houses, and rooms, but we had no pictures for these.) I wanted the kids to get a feel for where they fit in the world, but not put them at the center of the universe as so many other curriculum do. They fit as part of a bigger picture, each a piece in the world's giant puzzle.
With this as a foundation, we decided to start our Geography class out with a unit on our own country. (This was good timing for this unit since it started on June 14th (Flag Day) and would take us all the way through the week of the 4th of July.) After covering The United States as a country, as well as our early President's, the constitution, national symbols, ets. (see Core Knowledge Sequence), then we will move onto units on several of the individual states. How many of them we can get through before Christmas, I don't know; however, after Christmas we will be moving back into broader Geography with a look at several other countries. (Specifically the countries that are represented at Epcot center at Disney World--that way our trip there will be more meaningful! And because so many of those countries will be a good precursor for our American History Curriculum for first grade, of course. Come on now, we can't base everything in our life around our Disney World Trip next April!) After studying countries we will step back out again and move onto a brief look at the other continents not already represented in our study--Asia, Africa, Australia, and Antarctica. Then if we have time before the school year ends, I would like to do a unit on the Planets and Space. That would bring our Geography class full circle and stay coherent with our educational scheme. (Not that the kids notice, but my organized mind needs the structure.) I know this is a crazy lot to cover for a Kindergarten curriculum, but hey, if we end up home schooling long term, I am going to shake up the way I do a lot of things and take a giant leap away from regular school curriculum. Then I can use this class as a general guide to the world, and go on to teach history the way I would really like to--from the beginning, taking my time, with a comprehensive look at whole cultures. Thus merging the study of history, art, music, literature, philosophy, science, mathematics, and even religion. Oh, if I am up for the task of it all, and it is what we feel like is right, it could be so beautiful!
Monday, June 14, 2010
Core Knowledge Geography
WORLD HISTORY AND GEOGRAPHY
I. Geography: Spatial Sense (working with maps, globes, and other geographic tools)
• Maps and globes: what they represent, how we use them
• Rivers, lakes, and mountains: what they are and how they are represented on
maps and globes
• Locate the Atlantic and Pacific Oceans.
• Locate the North and South Poles.
II. An Overview of the Seven Continents
Teachers: Help children gain a beginning geographic vocabulary and a basic sense of how we organize
and talk about the world by giving names to some of the biggest pieces of land. Introduce children to
the seven continents through a variety of methods and media (tracing, coloring, relief maps, etc.), and
associate the continents with familiar wildlife, landmarks, etc. (for example, penguins in Antarctica; the
Eiffel Tower in Europe). Throughout the school year, reinforce names and locations of continents when
potential connections arise in other disciplines (for example, connect Grimm’s fairy tales to Europe;
voyage of Pilgrims to Europe and North America; story of “Momotaro—Peach Boy” to Asia [Japan];
study of Native Americans to North America).
• Identify and locate the seven continents on a map and globe:
Asia
Europe
Africa
North America
South America
Antarctica
Australia
History and
AMERICAN HISTORY AND GEOGRAPHY
Teachers: The study of American history begins in grades K-2 with a brief overview of major events and
figures, from the earliest days to recent times. A more in-depth, chronological study of American history
begins again in grade 3 and continues onward. The term “American” here generally, but not always,
refers to the lands that became the United States. Other topics regarding North, Central, and South
America may be found in the World History and Geography sections of this Sequence.
I. Geography
• Name and locate the town, city, or community, as well as the state where you live.
• Locate North America, the continental United States, Alaska, and Hawaii.
II. Native American Peoples, Past and Present
Teachers: As children progress through the grades of the Core Knowledge Sequence, they will learn
about many different Native American peoples in many different regions (such as Pacific Northwest:
Kwakiutl, Chinook; Plateau: Nez Perce; Great Basin: Shoshone, Ute; Southwest: Dine [Navajo], Hopi,
Apache, Zuni; Plains: Blackfoot, Comanche, Crow, Kiowa, Dakota, Lakota [Sioux], Cheyenne, Arapaho;
Eastern Woodlands: Huron, Iroquois, Mohican, Delaware [Lenni Lenape], Susquehanna, Massachusett,
Wampanoag, Powhatan; Southeast: Cherokee, Seminole). In kindergarten, study at least one specific
group of Native Americans. You might explore a local or regional tribe or nation, and compare it with
one far away.
• Become familiar with the people and ways of life of at least one Native
American tribe or nation, including:
–how they lived
–what they wore and ate
–the homes they lived in
–their beliefs and stories
–the current status of the tribe or nation
III. Early Exploration and Settlement
A. THE VOYAGE OF COLUMBUS IN 1492
• Queen Isabella and King Ferdinand of Spain
• The Niña, Pinta, and Santa Maria
• Columbus’s mistaken identification of “Indies” and “Indians”
• The idea of what was, for Europeans, a “New World”
B. THE PILGRIMS
• The Mayflower
• Plymouth Rock
• Thanksgiving Day celebration
C. JULY 4, “INDEPENDENCE DAY”
• The “birthday” of our nation
• Democracy (rule of the people): Americans wanted to rule themselves instead of being
ruled by a faraway king.
• Some people were not free: slavery in early America
IV. Presidents, Past and Present
Teachers: Introduce children to famous presidents, and discuss with them such questions as: What is
the president? How does a person become president? Who are some of our most famous presidents,
and what did they do that made them famous?
• George Washington
The “Father of Our Country”
Legend of George Washington and the cherry tree
• Thomas Jefferson, author of Declaration of Independence
• Abraham Lincoln
Humble origins
“Honest Abe”
• Theodore Roosevelt
• Current United States president
V. Symbols and Figures
• Recognize and become familiar with the significance of:
American Flag
Statue of Liberty
Mount Rushmore
The White House
Our Worm Rescue Mission
Our humanitarian efforts weren't simply limited to our rescue mission though. A second humanitarian project came up later that day as we spent some time talking about other animals--invertebrates to be specific--that are called worms but are not actually worms. Among these, of course, are silk worms, which are actually moths. As we read through our animal cards and learned all about silk worms, we were shocked to find out that you actually have to kill the worms to collect the silk. I always thought that the worms spun it, much like a spider spins a web. It turns out; however, the the silk is actually the worms' cocoon. The worm spins the silky cocoon around itself, and then the breeders throw the worm into boiling water, kill the worm, and retrieve the silk. Madison was horrified. She wanted to rush downstairs and check all of her night gowns right away to make sure none of them were real silk. Then we all had to sign a petition that we would never buy real silk again. (Anyone who would like to sign the petition can drop an e-mail to Maddi!) It's crazy the places home schooling, or simply learning in general can take you! Crazy, and so much fun!
Thursday, June 10, 2010
Worm Viewing, Experiments, Etc.
It was kind of amazing really. For instance, you probably didn't know it, but earthworms actually have five hearts. If you pick up an earthworm, you can tell it's head from it's tail by looking at the proximity of the ring around it's body, and by watching which end of the worm moves first. After locating the head, you can actually see the five hearts through the worms skin, as well as see the blood pumping through the veins and the dirt passing through the intestines. The kids loved this. They also found it very fascinating that the little ring around the worm is actually called the egg case and it slips off of the worm when the egg case is full of little eggs. I think their favorite fact about earthworms was that each worm is actually both a boy and a girl--they may have tried to fool you already by asking you our worm quiz question: What you would name your worm if you caught one? (We pick a silly question from each unit to ask Dad and our friends. That way the kids get a chance to teach someone else what they are learning when they explain the answers.) It was either that fun fact, or the fact that the largest earthworm is the Great African Earthworm measuring in at 22 feet. We measured it out on our garden hose and that is bigger than our whole family laying end to end on the ground!
In addition to looking at our worms in our hands, we also did a few hands-on projects so that we could get a look at our worms in their natural habitat. Project #1 was to construct a small glass chamber called a worm viewer. We bought all the supplies and followed the directions from one of our books step-by-step and pretty soon we had quite the clever little place to watch our worms tunnel about. (see picture below with our earthworm food experiment.)
Project #2 was a fancy little worm hotel we built out of an old two liter pop bottle. We chopped the top off and then layered different types of soil in the container. Then we placed the worms inside and wrapped construction paper around the bottle to make it pitch black. This encouraged the worms to tunnel near the edges of the bottle so we could observe the way they moved through and mixed up the different layers soil the soil.
Both of these projects proved to be pretty cool, but our earthworm unit couldn't stop there. We had to take advantage of our worms for a little longer and use them in a series of three experiments to gain even further insight into the wonderful world of worms. (We made sure to treat all of our worm subjects with love and respect by the way, and not one of our worm participants was injured or died.) After doing a little bit of research, and getting some ideas from our books, I devised three very simply earthworm experiments. I made up a work sheet that looked like this:
Worm Experiments
#1. Worm Charming
Legend has it that you can charm a worm out of the ground. Most worm charming methods involve vibrating the soil, which encourages the worms to the surface. The worms surface because the vibrations are similar to those produced by digging moles, which prey on earthworms.[
Date:_________________________________
Tools used for worm charming:______________________________________________
Number of worms collected:_______________
#2. Worm diet
Date:____________________________
Types of food presented:_______________________________________________________
Predictions: _________________________________________________________________
Our Worms Favorite food: __________________________________
#3. Earth Worms as Gardeners
Earthworm castings are said to enrich the soil and cause plants to grow more quickly and more abundantly.
Date: __________________________________
Hypothesis:________________________________________________________
Plant grown:_____________________________
Pot #1--No earthworms Pot #2--earthworms
Results:___________________________________________________________
And we used it to learn all about scientific observation, prediction, and hypothesis testing. Here are the kids with the latter two experiments.
And just for your information, we did actually charm one worm and two slugs out of the ground, our worms preferred parsley, just as Spencer predicted, and our corn with the worms in it's pot did grow better. (just barely--phew!)